Varialess Magmoor Run - Universal Route [Page 2]
(Guide Written by LeCoureur103)
(Images Taken From Kip's VMR Movie)
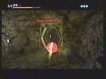
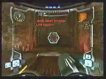
.:Shore Tunnel - 250-280 energy left:.
If you've made it here with 250 energy, you're right on track for a photo finish. I once managed to reach the door with 280, but I got raped by the turrets in Monitor Station. Anything below 250 has a pretty low chance of success, but you might get lucky with the energy in Monitor Station, so you should continue anyway.
You're rolling, baby! Just speed down the whole length of the room, making sure to turn sharply after the glass tunnel. Bomb the door, unmorph, and center your aim as well as you can before the door opens.
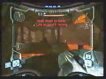
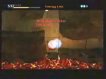
.:Monitor Station - 170-200 energy left:.
You know, I'm not entirely certain about the exact amount of energy you should have here. I was usually too busy preparing my aim before the door opened to take notice of the number on top of the screen.
At last, the infamous Monitor Station. It's what speed runners like to call a "segment killer" (after all, this 4-tank run is just a glorified speed run segment!). Many a fine attempt of mine met its end at the hands of the many Turrets lining the huge central structure, or the lava all around, or the Puffer floating lazily near the bridge at the far side of the room. You've got to know precisely what you're doing, and you need to be able to do it on the first try... else, you're Turret fodder.
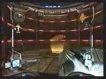
Here we go: the door to Monitor Station typically takes an extra second to open, during which you've aligned your aim. What are you aiming at? Why, the boxes under the central structure of course! As soon as the door opens, run forward while popping off a Missile directly at the boxes. Don't wait and see if it finds its mark... the turrets are activating. After you've fired, turn hard to the right while preparing a Charge shot, and without taking time to look carefully, tap L. The only thing in that general direction is a single Puffer, and as long as your view is that way, the L-tap should get you a combat lock. AS SOON AS YOU'VE GOT THE LOCK, DASH LEFT. The Turrets are nearly done waking up, and if you dilly-dally for any amount of time, a barrage of Turret-fire will remove a good 90 energy from your already-dwindling reserves.
So there you are: you're cruising through the air, passing within only a few feet of the Turrets, trying to get as close as you can to the back-left pillar of that holds up the structure. During this cruise, you are helpless, entirely at the mercy of the Turrets. Okay, maybe that's not true: I found that the Turrets don't seem to hit you as much if you tap up on the control stick a couple of times during the flight. You've still got the Charge shot, right? Its purpose is not to kill anything, but to reel in the energy from the boxes that you just blew up. These boxes tend to be pretty generous; many's the time I got 3 small energies from them.
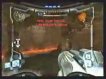
When you land, hopefully you�re close to the pillar. If you�re not, the Turrets will undoubtedly bat you into the lava, destroying any hope of success. Wherever you may be, what you need to do is jump onto the ring that surrounds the pillar, preferably on the back so the turrets can�t hit you. By this time, the energy from the boxes should be reeled in, so release the Charge shot; but if you haven�t noticed a rise in your health, by all means continue to hold the Charge until you do, but still continue with the instructions.
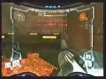
This is it: the make-or-break part of the run. It all boils down to this: whether or not you can space jump up to the little knob sticking out the back of the structure on your first or second try, without looking up, and without getting hit by the Turrets. Sound easy? Didn�t think so.
Jump slightly out, then up to the knob. It is IMPERATIVE that before you get too high, you acquire a combat lock on the leftmost Turret (leftmost from where you�re standing). Then when you land on the knob, you�ve still got a lock on it THROUGH the building; that is, you can�t see the Turret. It�s sort of like the early Space Jump method for PAL players, if that helps. When you land, use the Turret for a final dash-jump to the left. You need to hold DOWN on the control stick, then rotate the stick counter-clockwise up to the North-West position (5/8 of the way around the circle) to curve and turn the dash into a more favorable angle. In my opinion, the jump, lock-on, and dash here is the single most difficult thing you have to do. I can�t really offer any tips, except to practice it extensively on another file (preferably one that doesn�t have the Plasma Beam yet, so the Turrets are here and not Flying Pirates).
Let's just say you managed a perfect dash and are in the little nook by the door. Shoot the door and run in.
.:Transport Tunnel A - 100-130 energy left:.
If you�ve made it here with anything above 100 energy, you�re golden. You *might* get away with 95 or so, but that�s cutting it awfully close.
When you�ve run through the door, morph and roll right into the tunnel. Roll, dammit! Roll for all you�re worth!! Make sure you don�t fudge up the single bomb jump up to the raised area! When you roll out into the clearing, roll right up to the door and lay a bomb, unmorph, and pray to your preferred deity that you�ve got enough energy!
.:Elevator - 1-40 energy left:.
The elevator here is a 'cool' room... meaning you made it! Whew, that was a trip, wasn�t it? From here, it�s one elevator ride, three sheets of ice, and one missile lock to reach the save station. Just make sure you don�t get pwnd by one of those little ice critters.
.:Closing:.
Depending on how well you did, you could have anywhere from 1 to 40 energy left. Myself, I had 11 on my historical no-Varia run - and I was actually hit by a Turret in Monitor Station for 30 damage, meaning you don�t have do this perfectly... but you�d better be pretty close to perfect!
Not everyone will be able to accomplish a no-Varia run... even with a 40-energy margin of error, this is one tough cookie to crack! Heck, it took me about 7 hours total to get it, and I'd consider myself a pretty decent speed runner! And did I mention that two of those hours were even after I had perfected the final version of the route? Yeah, it's that hard.


Kip's Varialess Magmoor Run (4.9Megs Zipped)
^Return to top
This site's code, layout, text, and unique movies are the sole copyright of Samus.co.uk's owner Andrew Mills (2005)
|
|